Friday, 22 November 2024
How to Build a Small Plywood Boat for Kids
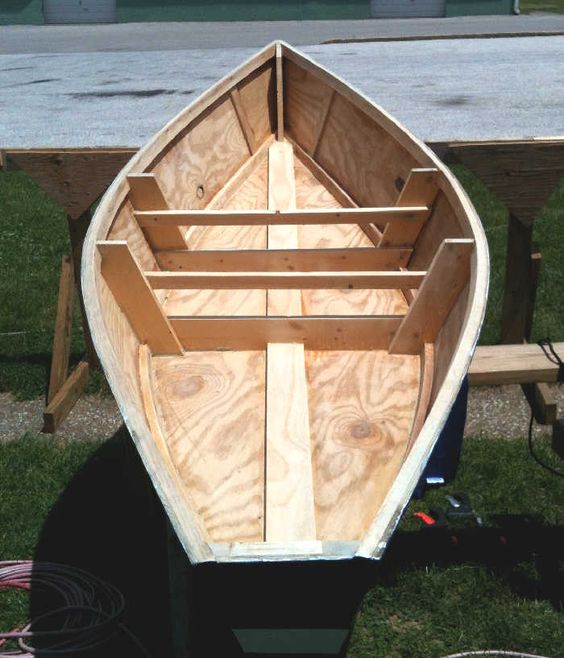
Building a Small Plywood Boat for Kids: A Fun DIY Project
Building a small plywood boat for kids is a fantastic way to spend quality time with them, teach them some basic woodworking skills, and create a lasting memory. It's a project that's both challenging and rewarding, and the end result will be a boat that your kids will cherish for years to come. So, grab your tools and let's get started!
Materials You'll Need
Before we begin, let's gather the materials you'll need. Don't worry, it's not a long list!
- Plywood: Marine plywood is the best choice for boat building because it's water-resistant and durable. Choose a thickness of 1/4" or 3/8" depending on the size of your boat. You'll need enough to cover the bottom, sides, and any internal supports.
- Wood glue: This is essential for bonding the plywood pieces together.
- Wood screws: Use stainless steel screws to prevent rust.
- Waterproof sealant: This will protect the wood from water damage.
- Paint or stain: This is for adding some color and personality to your boat.
- Measuring tape: For getting those measurements just right.
- Pencil: To mark your cuts.
- Saw: You can use a jigsaw, circular saw, or handsaw to cut the plywood.
- Sandpaper: For smoothing out the edges and making your boat look nice.
- Clamps: To hold the pieces together while the glue dries.
- Safety glasses: Always wear safety glasses when working with power tools.
- Optional: Oars, a mast, and sail.
Design Your Boat
Now for the fun part - designing your boat! Consider these aspects:
- Shape: Do you want a traditional flat-bottom boat or something more curved?
- Size: How big do you want the boat to be? Remember, it needs to be big enough for your kids to fit in comfortably but small enough for you to handle.
- Features: Do you want to add any extra features, like a bench, a storage compartment, or a deck?
If you're unsure about the design, there are many online resources and books with boat plans specifically tailored for kids. You can also use a simple cardboard model to test out your design before cutting into the plywood.
Cutting and Assembling the Hull
Once you've finalized your design, you're ready to start building!
1. Cut the Bottom:
Carefully mark the bottom of your boat on the plywood, using your pencil and measuring tape. Then, cut the piece out using your saw. Be sure to wear safety glasses!
2. Cut the Sides:
The sides of your boat will need to be curved to match the bottom shape. You can use a flexible measuring tape or a piece of cardboard to create a template for the curve. Mark the plywood, then cut out the sides using your saw.
3. Assemble the Hull:
Start by attaching the sides to the bottom of the boat using wood glue and screws. Make sure the sides are flush with the bottom and that the edges are aligned. Use clamps to hold the pieces in place while the glue dries.
4. Add Internal Supports:
For extra strength and stability, you can add some internal supports to your boat. These can be made from scrap plywood or other sturdy wood. Measure and cut the supports, then attach them to the inside of the hull using glue and screws.
Finishing Touches
Your boat is almost ready to hit the water! Here's how to finish it off:
1. Sanding:
Sand down the exterior of the boat with sandpaper to smooth out any rough edges and prepare it for painting or staining. Use different grits of sandpaper, starting with a coarser grit and finishing with a finer grit for a smooth finish.
2. Sealing:
Apply a layer of waterproof sealant to the entire surface of the boat. This will protect the wood from water damage and make the boat last longer.
3. Painting or Staining:
Now it's time to add some personality to your boat! You can paint it a bright color, stain it with a natural wood finish, or get creative with designs. Let your imagination run wild!
4. Adding Oars and a Sail:
If you want to add oars or a sail, now is the time to do it. Attach the oarlocks securely to the sides of the boat and make sure the sail is strong enough to withstand the wind.
Launching and Enjoying Your Boat
Congratulations! You've built a fantastic boat for your kids. Now it's time to launch it! Find a safe place to launch the boat, like a lake, a pond, or a calm river. Make sure the kids are wearing life jackets and that there's an adult present to supervise. Let the fun begin!
Commonly Asked Questions
Here are some frequently asked questions about building a small plywood boat for kids:
1. Can I use regular plywood instead of marine plywood?
It's best to use marine plywood because it's treated to resist water damage. Regular plywood will eventually rot and become unusable if exposed to water.
2. How do I make the boat watertight?
You can make the boat more watertight by using wood glue and screws to attach the pieces together and by applying a waterproof sealant to the entire surface. You can also use fiberglass resin to coat the inside of the hull, making it more watertight.
3. What are some safety tips for using the boat?
Always wear life jackets when using the boat. Make sure there's an adult present to supervise. Avoid launching the boat in rough water or strong currents.
Building a small plywood boat for kids is a fun and rewarding project. It's a great way to teach them about woodworking, creativity, and the joy of being on the water. So, gather your materials, put on your safety glasses, and get started!

No comments:
Post a Comment